Tutorial
Repository Manager (RM) is designed to provide a simple to use
Graphical User Interface for any Java Content Repository (JCR)
compatible repository. RM comes with a JCR compatibility layer for
Subversion and will shortly also include a compatibility layer for CVS.
RM aims to provide a uniform interface to manage a wide range of
repositories without having to learn a different set of commands for
each repository.
One of the key features of RM is that you don't need to have a working
copy of a project or module on your local machine to manage the
repository and you don't need to be on the Repository Server.
Connecting to a Repository
RM uses the JCR naming conventions when referring to different aspects
of a Repository as this provides uniformity across all Repositories. So
lets start by covering some of the key descriptors.
Workspace
- a workspace refers
to some sub-tree of a repository where the root of the Repository is
considered a valid sub-tree. The Workspace always includes the fully
qualified path to the Repository. The form of the fully qualified path
is Repository dependent. For instance Subversion supports two types of
Repository paths dependent
on the type of Subversion
Server the repository is running (and some repositories may choose to
run both).
e.g.
http://svn.lam-mpi.org/trillium
svn://svn.lam-mpi.org/trillium
Both of the above Workspace descriptors refer to the same
repository.
When defining a Workspace you don't have to specify the root of the
repository. It is quite legal (and legitimate) to have two or more
Workspaces defined for the same repository. You many want to do this if
you are running multiple projects within a single repository and when
you are administering a given project you only want to see the files
that relate to the project.
RM allows you to connect and disconnect to one or more Workspaces via
the Connect and Disconnect dialogs. It also tracks each workspace you
have connected to via the Repositories dialog. This acts like a 'Most
recently accessed files' list, but at the workspace level.
Connecting
- you can connect
to an existing repository by clicking the 'Repository' menu followed by
'Connect' whereby the following dialog will appear.
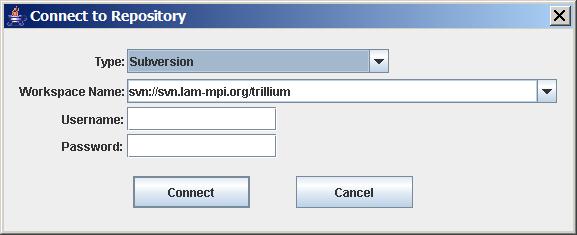
To connect to a Subversion Repository (the only type that is supported
at the time of this witting) select 'Subversion' from the 'Type' drop
down list. Then enter the URI to your subversion repository.
Next enter the username and password to connect to the repository with
write access (not required if you only want readonly access [and not
currently supported]).
Disconnecting
- to disconnect
from a workspace click the 'Repository' menu followed by 'Disconnect'
whereby the following dialog will appear.
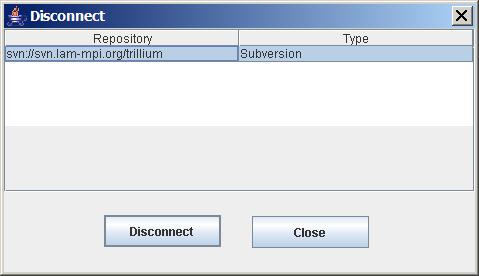
If you have more than one Workspace open select the workspace that you
want to close for the list and the click disconnect. You can also
select multiple workspaces by holding down either the SHIFT key (for
contiguous selection) or the CONTROL key (for dis-contiguous selection)
while clicking two or more repositories that you want to close. Once
you have selected the desired workspaces click disconnect.
Alternatively
you can simply close
the RM application.
Repository Manager
Interface
The RM Interface is split
into three core areas:
- Workspace Tree
- File Listing
- Version History
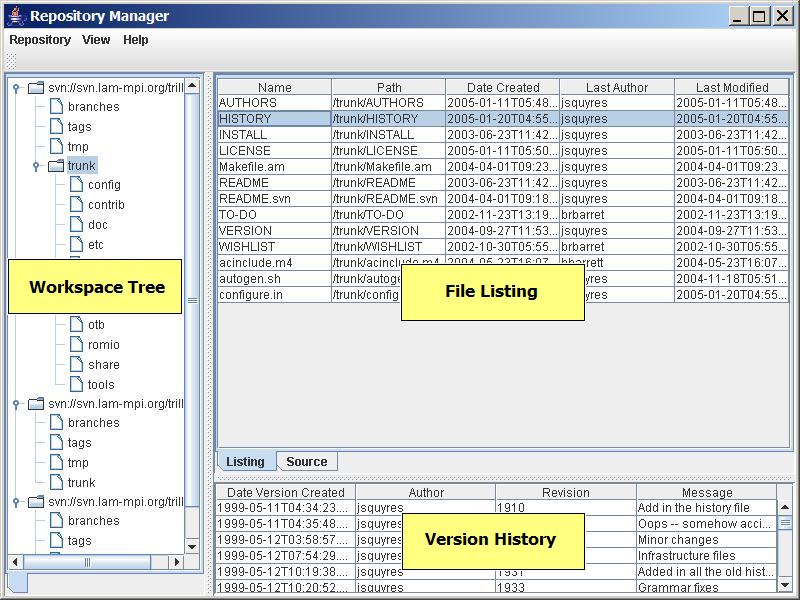
Workspace
Tree - The workspace
tree displays the folders present in a workspace as a simple tree view.
To view the file listing of a folder just (left) click the directory of
interest. In a few moments (depending on how far away your server is)
the list of files for that folder will appear in the file listing pane.
The workspace Tree support a number of other actions which can be
accessed through a context menu. Right click (or whatever button/key
combination you use to bring up a context (popup) menu) on the folder
you are interested in to view its context menu.
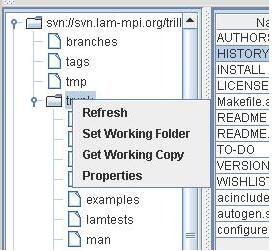
The context menu provides the following options:
Refresh
- re-fetches the list
of sub-folders and files contained in the folder. This can be handy if
you know/supsect that a third party has updated the repository since
you first connected to it.
Set
Working Folder - sets the
directory on your local machine where all working folder options will
be performed. Note: RM does NOT require you to have a working copy of
your repository on you local machine (or anywhere else) for you to
perform basic administration operations on the workspace. You only need
to set a working folder if you want to use RM to get a local copy of
one or more files or folders.
Get
Working Copy - creates a
working copy of the designated files or folders on your local machine.
Note: this is not the same as a Subversion working copy as it does not
create any .svn directories. It is more akin to exporting files for a
repository.
Properties
- displays the
folders properties.
File Listing
The File Listing pane
displays the list of files contained in the folder currently selected
in the Workspace Tree. The File Listing supports a number of
actions which can be accessed through a context (popup) menu. The
action applies to the file that is under the mouse when you click to
open the context menu.
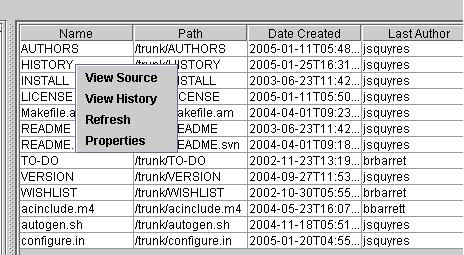
View
Source - the source for
the selected file is displayed in a tabbed pane.
View
History - the history for
the selected file is displayed in the Version History pane.
Refresh
- re-fetches the list
of files contained in the current folder. This can be handy if
you know/suspect that a third party has updated the repository since
you first connected to it.
Properties
- displays the
properties for the selected file.
Version
History
Displays summary information
for each historical version of a
file and provides an action to compare (diff) any two versions of a
file. The Version History supports a number of
actions which can be accessed through a context (popup) menu. The
action applies to the file version that is under the mouse when you
click to
open the context menu.
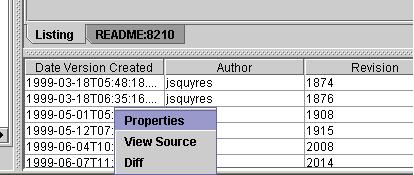
Properties
- displays the list
of properties for the file including the full message text.
View
Source - displays the
source of the file as it was at the selected version in a tabbed pane.
Diff
- compares and
graphically displays the differences between two file version. Two
compare to file versions select the first version using a left mouse
click and then selected the second file version by holding down the
control key while performing a left mouse click (discontinuous
selection). The exact key sequence may vary from operating system to
operating system.
Difference
Dialog
The difference dialog is
displayed when you select the 'Diff'
action from the Version History context menu. The difference dialog
displays a graphical representation of the differences between two
versions of a file.
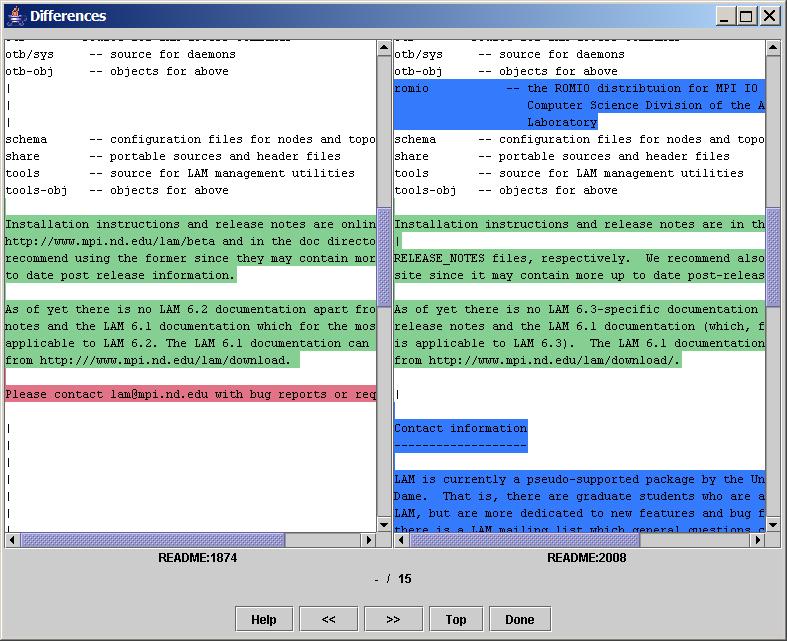
The changes are color coded with the following meaning:
Red - the line which is highlighted in red has been deleted and is not
present in the other file version.
Blue - the line has been added and is not present in the other file
version.
Green - the line has been changed from one version to the other.
Note:
The currently selected
point of difference highlight is changed to gray
to provide a clear indication of which difference is the current one.
A number of action buttons are available to aid in navigation.
Done
- closes the Difference
Dialog
Top
- scrolls both windows to
the first line of the file.
>> - moves the current position to the next point of
difference
in the file.
<< - moves the current position to the previous point of
difference in the file.
